Today we’ll be letting the enemy in. Whenever conducting pentests it’s often the human side of the business that fails the infrastructure. If we just had computers running the place it would all be fine but nooooo someone thought it would be a good idea to let people on the network to. And to get them there we need client computers…
Windows is now up to version 10 (build something something) and is starting to become more prevalent. Even though Windows 7 is just days away from reaching end of life it’s still firmly entrnenched in a lot of businesses. But it’s out the door and I dont feel like a pentest lab of the future needs it’s smelly carcass lying around so we’ll jsut stick with Windows 10 clients here.
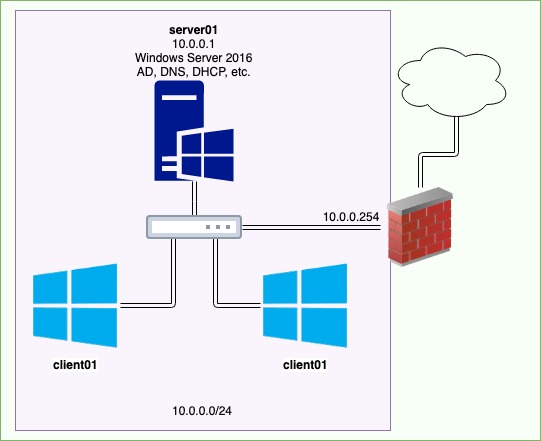
As a reminder this is the basic layout we are going for
We will build one client from scratch and then with the magic of virtualisation we can clone that to create a second one.
As with Server 2016 Microsoft offers trial downloads of Windows 10 However they are only 90 day trials rather than 180 days. Not sure what happens when we reach that mark but we’ll find out in 2020.
The download is available at https://www.microsoft.com/en-gb/software-download/windows10ISO . There is no choice in version at time of writing and the language I have chosen is English International (which is actual english. Not like Microsofts ‘English’ which is the one where they forgot all the u’s). You do get to choose architecture bvut there’s not much reason to go for 32bit so make sure you choose 64 as that’s the future!
Proxmox has a Windows 10 best practice guide that we will be basing this post off of, it is available here
Initial VM Creation
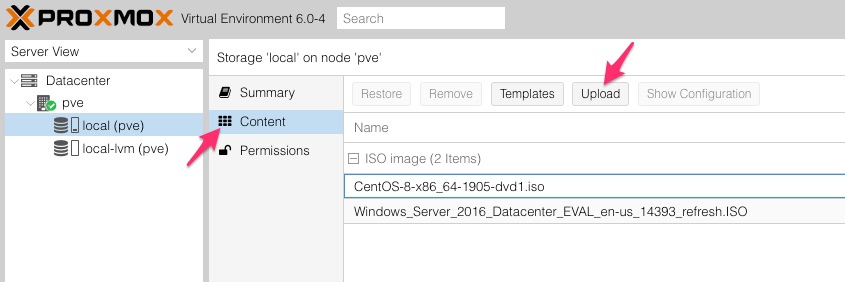
First off it’s necessary to get the Windows 10 ISO up on to the storage on Proxtop. As previously performed this is via Datacenter > pve > local (pve) > content. This may be slightly different if your server isn’t called pve.
Click on Upload and choose your Windows 10 ISO
Once uploaded click on Create VM at the top of the Proxmox dashboard to start our VM creation. As with the server VM i;m not going to go through all settings, just ones that should be tinkered with.
-
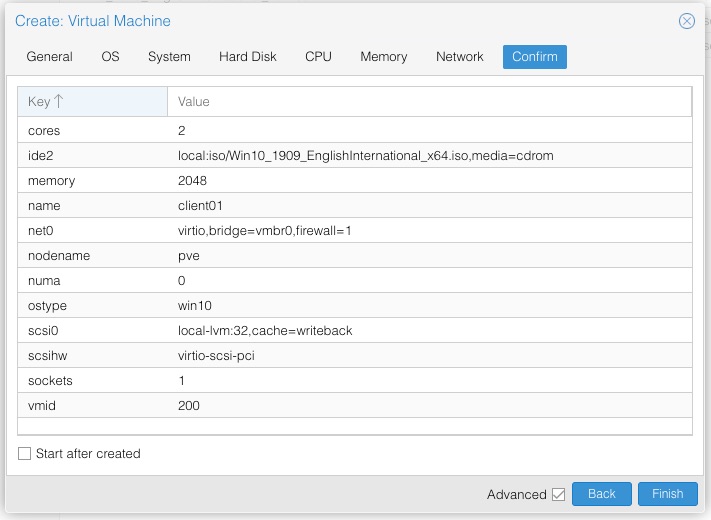
General
Node- We only have the one to choose from but if we had a heftier lab we might be able to choose something else. We could perhaps have a ‘server’ node and a ‘client’ node for instance.VM ID- It’s not necessary to change this however since the 2016 server is 100 I thought Id start the client numbering from 200Name- Call it whatever you want. The server is server01 and is per our diagram we are going to name our clients client01 and client02. So this one will be client01. -
OS
Storage- localISO image- choose your Windows 10 ISOType- Microsoft WindowsVersion- 10/2016 -
System
Qemu Agent- Select thisSCSI Controller- VirtIO SCSI -
Hard Disk
Bus/Device- SCSI, 0Cache- Write backDisk size (GiB)- 50GiB should be plenty. Feel free to go bigger if you think you will be testing a lot of software, or smaller if you don’t have much space. -
CPU
Sockets- 1Cores- 2. You could do the Sockets and Cores the other way around. It makes no difference for performance, it’s just a licencing thing with some OS’s. -
Memory
Memory (MiB)- 2048 MiB. This should be enough. If we find things are shit we can turn it up later. I think the minimum requirement for Windows 10 is only 512KB but that would be a struggle. -
Network
Bridge- vmbr0 (Hopefully this will be your only option here. If you have set things up differently then choose appropriately)Model- VirtuIO (paravirtualized) -
Confirm
Assuming all is OK click on Finish to build your VM.
Windows 10 Initial Installation
Warning: Before starting make sure your 2016 server is running. It isn’t necessary for the initial setup btu we will need it down the line for initial network config via DHCP and for joining our clients to the domain.
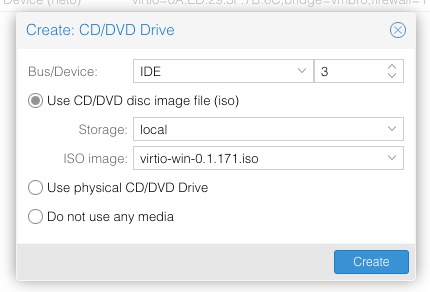
Before launching the VM we need to insert the driver ISO for loading Proxmox drivers. As with the server setup the driver ISO can be downloaded from here. At time of writing I downloaded the Stable virtio-win ISO.
Once this is downloaded it needs to be stored on the host just like we’ve done with the OS ISOs. We then need to virtually install it in our VM. We already have or OS install DVD in one drive so we’ll need to create a second drive for the driver ISO. In the Hardware options for our server click on Add > CD/DVD Drive. Choose Bus IDE and Device 3 along with selecting the drive ISO:
And then create
Now the VM is built it can be laucnhed from the console. Select your new VM (in my case it’s called 200 (client01)) and click Start at the top of the Proxmox dashboard. You can then view the VM from Console > noVNC
Choose your language (if you have downloaded the ‘English’ version then you will only be able to select US english at this point but you should be able to set an appropriate keyboard layout) click Next and then click Install Now.
At the Activate Windows screen click on I don’t have a product key.
For the install version choose Windows 10 Pro and click Next.
Accept the licence terms (after reading them obviously) and click Next.
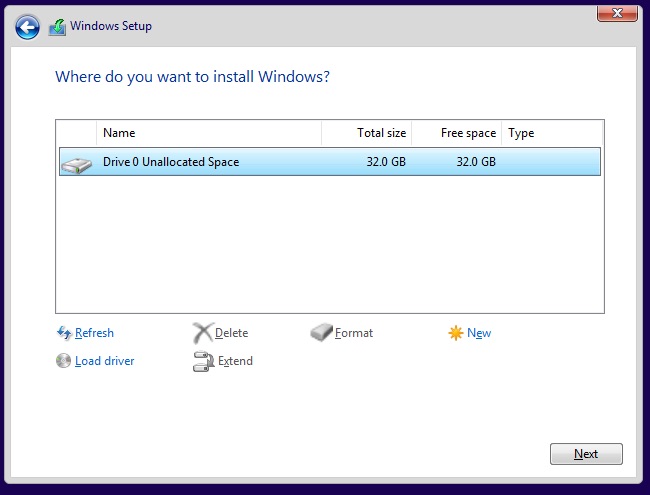
At the Which type of installation do you want screen make sure to choose Custom as we will need to load some drivers here.
Now click Load driver and then click Browse from the pop-up dialogue. There are three drivers that need to be installed, complete this same process for all of them.
Hard Disk - Browse to ISO\vioscsi\w10\amd64 and click OK. You should be given just one driver option, Red Hat VirtIO SCSI pass-through controller. Select this and click Next to install the driver.
Network - Browse to ISO\NetKVM\w10\amd64 and click OK. You should have one driver available, Red Hat VirtIO Ethernet Adapter. Select this and click Next to install.
Memory Ballooning - Brose to ISO\Balloon\w10\amd64 and click OK. This gave me two driver options but they were identical, VirtIO Balloon Driver so I just chose the top one. Click Next to install.
Now you should be able to select your disk and click Next to begin the installation.
Windows 10 Guided Setup
Once the installer gets to 100% it will automatically reboot and take us through the Windows 10 guided setup. We want to complete this part before cloning as the settings will be the same in both client VM’s. Once installation has gotten to 100% the installer will go through a couple of reboots and some initial automatic setup. Once this is done the guided set up will ask basic setup things such as location, keyboard, etc. Choose options accordingly.
During this portion a network connection is required. If you have issues here make sure your server is up and running and your DHCP is functioning correctly.
When you get to the personal/organisation screen choose Set up for an organisation and click Next.
On the next screen click the link for Domain join instead and you will be taken to the next screen asking for a Name. This will be the local admin account so choose accordingly. I have used the name admin with an appropriately secure password (it’s definitely not Password01…). And choose some security questions (I do often wonder if these security questions are used for data gathering).
Now you’ll be taken throguh a few screens asking if you want your privacy invaded by annoying stuff. Disagree to everything.
Once that part is over Windows will politely set up the basics for you and cycle through a few blue and black screens, just wait this bit out. Once finished you will be landed on the desktop. Nearly there!
VM Cloning
Now that the initial installation is complete we want to clone the VM before making any local customisations. First step is to shut down the VM. Pretty sure you can handle this part on your own!
Now we are ready to clone the VM, this part is super easy. Within the Proxmox console right click on your client (in my case 200 (clent01)) and click Clone

Choose the obvious options and click Clone

After a few minutes (depending on disk size) you will then have another VM in your Proxmox console. To see the status of the clone you can double click on the task in the Tassk window at the bottom of the Proxmox dashboard.
Windows 10 Setup and Domain Joining
Now that we have our two clients set up we can complete their setup and get them joined to the domain. I’ll go through the process with client01, obviously the process will be virtually identical for client02 with the only difference being the name.
Fire up the VM that you are going to configure and launch the console.
Log in with the username password you configured during the initial setup.
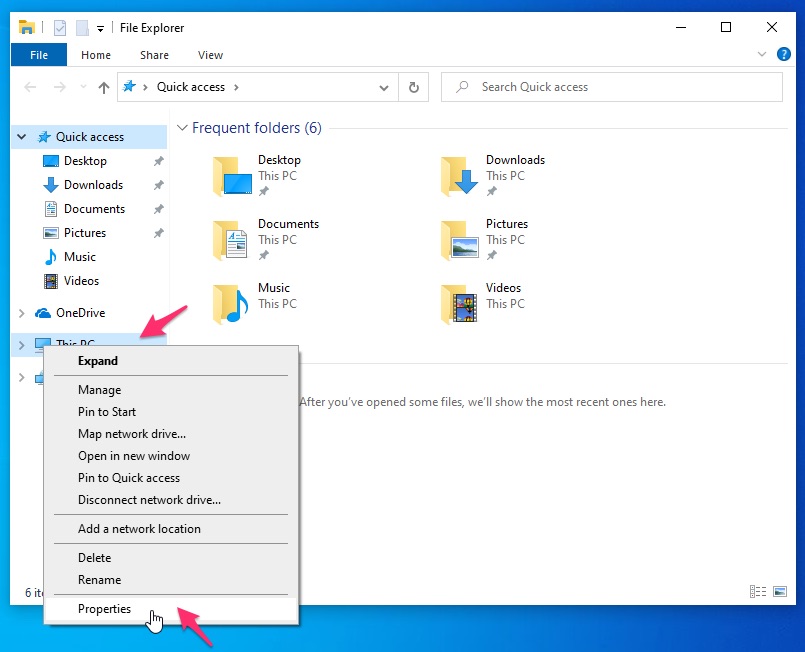
Now we need to rename the host and join it to a domain. I still haven’t found out if there’s a correct way to do this in Windows 10 so I still resort to the old method. Open File Explorer and right click on This PC and choose Properties:
Followed by clicking on Change settings to the right of the System window and then Change in the System Properties window
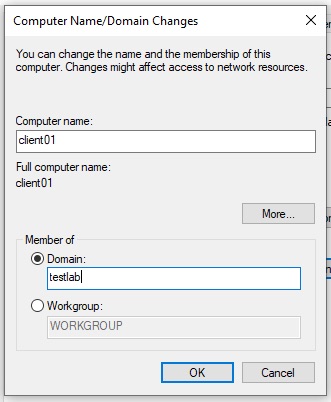
Enter the new computer name (in this case client01) and then select the radio button for Domain and enter our domain name. (in my case it was testlab) and click OK
Windows will reach out via DNS to discover a valid DC for this domain. It will find server01 and connect to add this computer to AD, to do this requires domain admin rights so it will ask for a domain admin login. Enter the account that you set up for the server, most likely Administrator and click OK.
Give it a bit and you will get a welcome message from the domain. Click OK again and you will be requested to reboot, click close and then restart now. Once restart you will be taken to the login screen.
The End (of the Beginning)
At this point the client computer is now set up and joined to the domain, and so ends Part 2. You now have a virtualised environment hosting a domain infrastructure comprosed of a single domain controller and two client desktops.
Well done on taking this step to getting a pentest lab set up. It is a very worthwhile tool to have for testing and experimenting. Stay tuned for further posts on lab based bits and pieces.