Now that the Proxtop has a basic setup and network config ready to go it’s time to start loading on our hosts. We’ll start with the server.
Windows Server 2019 is now available however I’m going with 2016. It’s good to have your lab on common releases and to be honest in the real world i’m still mostly seeing 2012 deployments with a few 2016 and 2008 scattered around so even having 2016 in our lab might be a bit advanced!
Microsoft now provides 180 day trials of their server software which is plenty enough for us to run with in our lab. They also provide 90 day trials of desktop software which will be handy for Part 2. Once the 180/90 days expire I think there’s not much limitation and just some prompts on the screen, I guess we’ll find out next year some time.
Download Windows Server 2016 ISO from the official Microsoft repo here. You need to enter some details before you download but there is no verification.
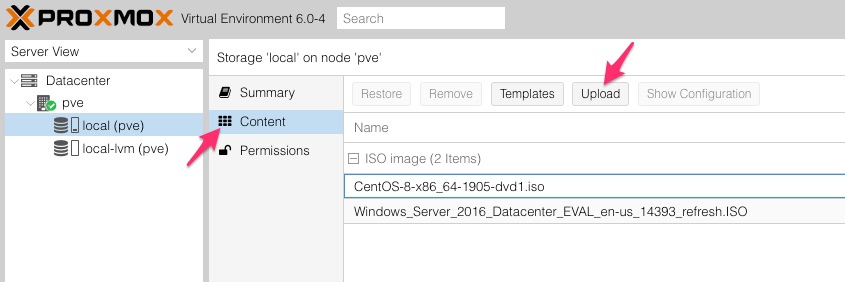
Once ISO is downloaded upload to the host storage on pve using the Upload button within Content
For the VM setup Proxmox has a best practice guide for Server 2016 deployment here] and also a video narrated by text to speech here. There are guide for other OS’s as well in case you’ve decided to go off piste.
VM Creation
So to begin click the Create VM button in the top right corner of the Proxmox web GUI and you’ll be presented with this window:
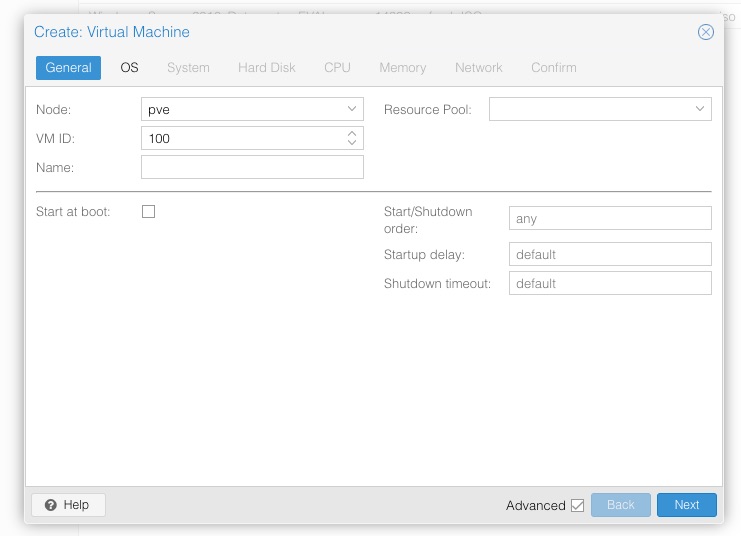
By default the Advanced box isn’t ticked so tick that to see the extra options. I’m not going to go through every option in this window, only the things that will be adjusted.
-
General
Node- we only have the one option here. If we had more devices in our Datacenter we could choose which to deploy toVM ID- your choice here. I’m sticking with the default 100Name- something sensible. In my case i’m going with server01 -
OS
Here should be straight forward. Choose the ISO that you uploaded in the last step and set the Guest OS options appropriately.
-
System
Qemu Agent- make sure you tick this box. We’ll need this in our installation.Leave everything else as default
-
Hard Disk
Bus/Device- Set Bus toSCSICache- Set this toWrite back. The default is a bit safer but also slower.Disk size (GiB)- Sert this appropriately. We are setting up our server with GUI and all the tools. From experience we could probably get away with the default 32GiB here but we’ve got plenty of space in our lab so will push it out to 60 in case we want to add anything down the line. -
CPU
Cores- always good to have a minimum of 2 cores. Honestly have no idea how many are on my physical processor but we’ll choose 2 here. Leave Sockets at 1. You can if you wish choose 2 Sockets and 1 core, the underlying KVM will end up doing the same thing anyway. -
Memory
`Memory (MiB) - This needs to be enough but not too much. We have 16GB in total and need to share this between the host OS, our single server, and our two desktops. Might also be dropping an attacking guest in here so be weary of that. For now 4GB (approx 4096 MiB) should be plenty for our server.
-
Network
Model- Choose VirtIO (paravirtualised) -
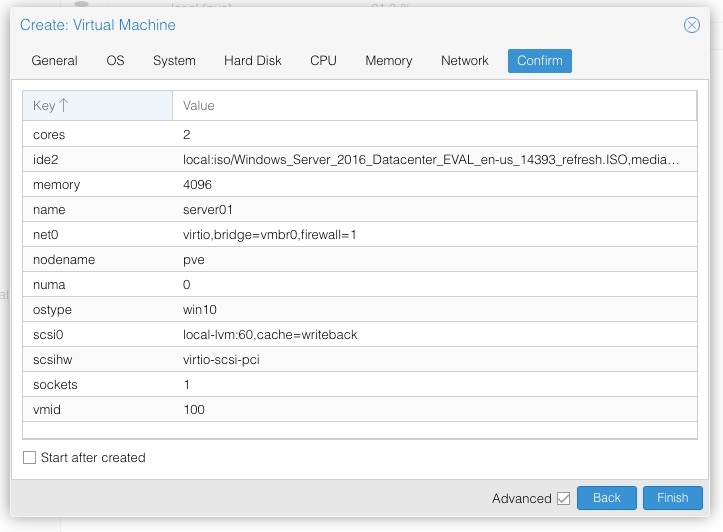
Confirm
Make sure you’ve got everything as above(below) and then click on Finish
OS Install
So now the VM has been created and will be visible under the pve node in the Server View. Before launching we need to grab the VirtIO drivers so that we’re ready to add these to the server. The driver ISO can be downloaded from here. At time of writing I downloaded the Stable virtio-win ISO.
Once this is downloaded it needs to be stored on the host just like we’ve done with the OS ISOs. We then need to virtually install it in our VM. We already have or OS install DVD in one drive so we’ll need to create a second drive for the driver ISO. In the Hardware options for our server click on Add > CD/DVD Drive. Choose Bus IDE and Device 3 along with selecting the drive ISO:
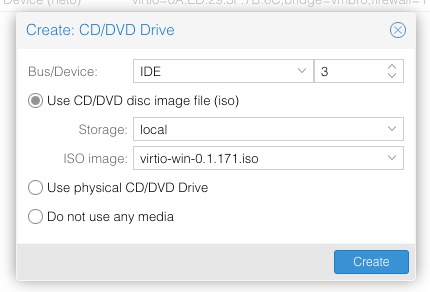
And then click on Create to complete.
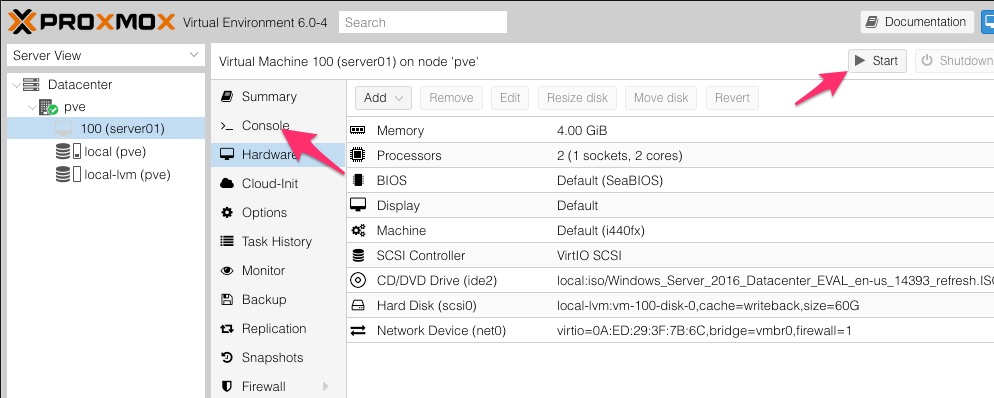
Now it’s time to launch our first VM. How exciting!
To launch our server first select it from the Server View tree and click on the Start button. You can then click on the Console button to view the server via noVNC
Click through a couple of screens choosing sensible options. When you get to the screen to choose the OS you want to choose a Standard Evaluation (Desktop Experience). Datacenter includes a lot more support for Hyper-V stuff which we don’t need. The non Desktop Experience options literally don’t have a desktop and need to be managed remotely, don’t do this.
Keep going until you get to the screen which gives the options for Upgrade or Custom. Choose Custom as this is where we need to add our VirtIO drivers.
You’ll get a screen like this:
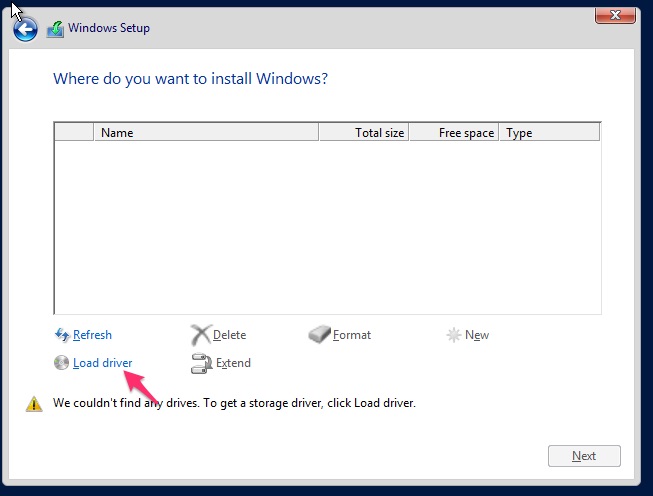
Click on Load driver and hopefully you’ll see a screen with a list of controller drivers. If not check you have added the virtual DVD correctly.
Choose the Red Hat VirtIO SCSI pass-through controller (E:\amd64\2k8\vioscsi.inf) option and click on Next. This will make the virtual hard disk visible to Windows.
It is also necessary to load drivers for the network interface, and for memory ballooning. To do this you must again click on Load driver and then rather that choosing one of the options displayed, click on Browse and go through the file system to select the appropriate driver. This must be done twice as there are two drivers to select soa ensure you complete the process by selecting the valid driver and then clicking Next before returning to Load driver:
e:\NetKVM\2k16\amd64 for the network driver
e:\balloon\2k16\amd64 for the memory ballooning driver
Once these are both done click on Next in the disk window. The installer will now progress with the installation, go grab a coffee.
Server 2016 Configuration
So on this server we are going to want to setup the following services:
Active Directory
DNS
DHCP
Once the installation completes the VM will reboot after which the initial config will begin. You’ll first be asked to create a password for the Administrator account. This will initially be the local Administrator however once we set up AD this will then become the domain Administrator. If this were a live corporate environment then I’d recommend a strong password however as this is for our pentest lab we can afford to be a little lax. Standard Windows password complexity will be enforced so make sure you set soemthing secure like Password01. So set up a password (dear lord don’t forget it) and click Finish.
After a short time you will be presented with a standard Windows Server desktop and the Server Manager. Before doing anything here we need to finish off some bits and pieces to get the VM functioning correctly within Proxmox. If you notice anything odd with behaviour at this stage just deal with as the additional drivers and guest agent will hopefully solve it.
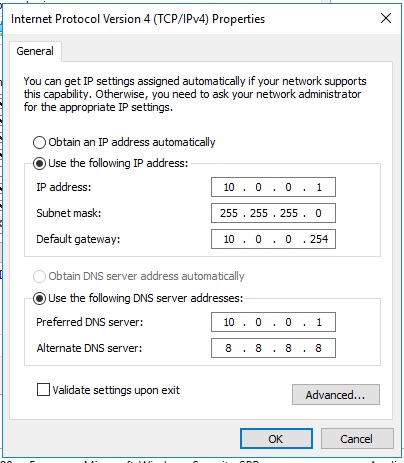
The next step after this is to get our network interface up. We need to assign a static IP to our server from the plan above. Right click on the network icon (bottom right corner next to the clock) and choose Network and Sharing Center. Then in the menu on the left click on Change adapter settings. In the next window you should hopefully see the Red Hat VirtIO Ethernet Adapter. Right click on this and choose Properties.
For now we just want to set up the IPv4 setting so double click on that line and complete as below (or not if you’re doing something different)
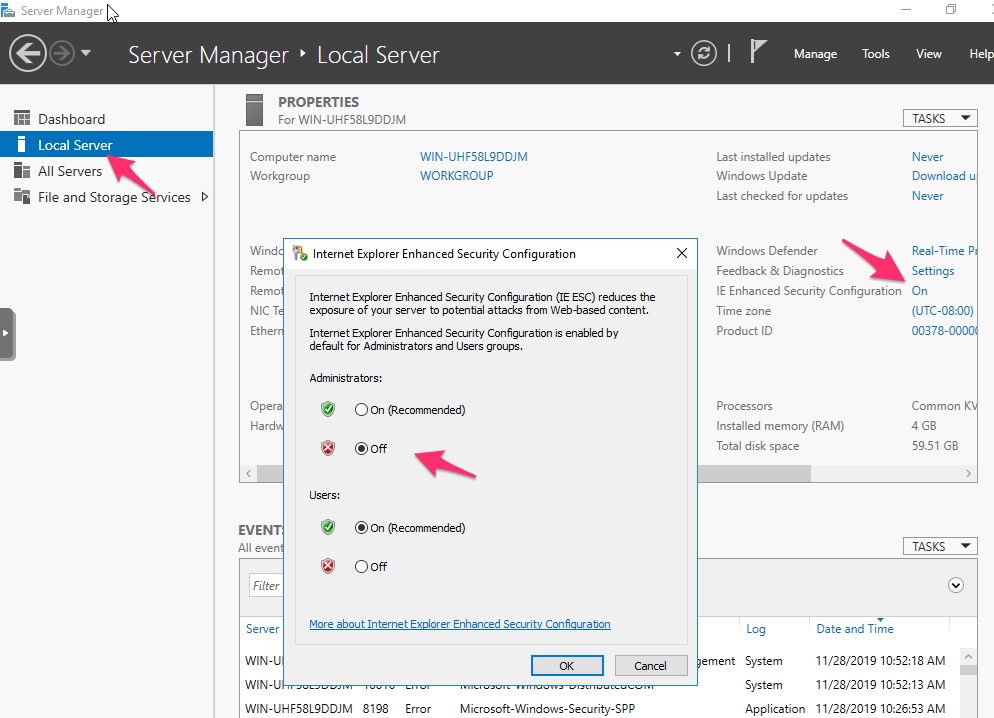
First thing i’d recommend doing is getting a half decent web browser. We can download another one but first need to sort out Internet Explorer. On a server by default the IE Enhanced Security Configuration is on. This makes it a pain to use IE for downloading stuff (yea it’s secure but at what price!). In Server manager select Local Server on the left and then disable IE ESC on the right.
While we’re here we can name the server. Coick on the current computer name within Local Server and then click on Change. Enter a new server name. In our case this will be server01server01 (this will want a reboot. Feel free to do this before continuing.)
Also make sure you set the time zone. This option is just underneath the IE ESC setting.
Once rebooted log back in and then open IE, Bing google and then Google whatver browser you want and download that.
So for all the drivers we want to get our hands on virtio-win-0.1.173-2 from here. easiest to just Google it as we don;t have clipboard sharing up yet. Once this download run it and we’ll get the install window.
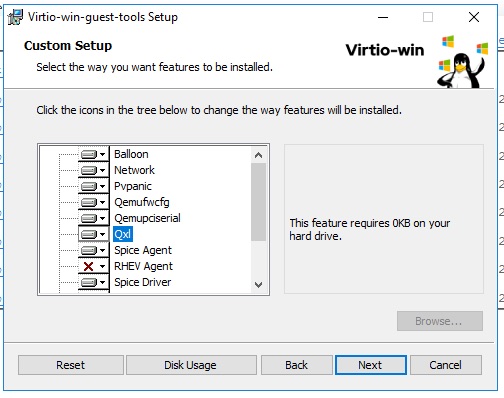
Click through and agree to everything. After the install a restart will be requested. Do that.
I found that the guest agent install that came with the driver ISO didn’t seem to do much on Server 2016. So to download the guest agent open your browser of choice and browse to https://fedorapeople.org/groups/virt/virtio-win/direct-downloads/archive-qemu-ga/qemu-ga-win-100.0.0.0-3.el7ev/. OK so clipboard sharing isn’t available via noVNC so to make this easier you can just Google qemu-ga-win-100 and you should find a link to the above a few rows down.
Roles and Features
Now comes the exciting part! We get to install all the Roles and Features we need for setting up an AD and making this a DC.
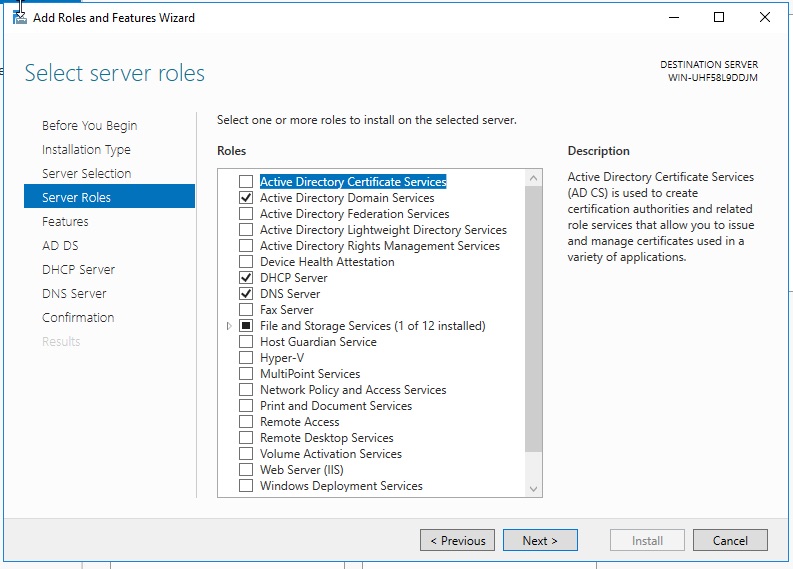
From the Server Mnager dashboard click on Add roles and features. Clikc Next, Next, Next until you get to the Select server roles window. Here we want to choose the following:
Active Directory Domain Services
DHCP Server
DNS Server
Each time you click on one of the checkboxes you will be presented another window showing dependent features, agree to all of these.
Click Next, Next, Next, Next, Next, Install. This will then proceed through the installation of all the required Roles and Features. You can close this window and let it continue in the background if you like. Once install is complete we move on.
Promote Server to Domain Controller
This is the bit where we make our server more important. All good Active Directories require a Domain Controller and this is the part where we promote our happy little server.
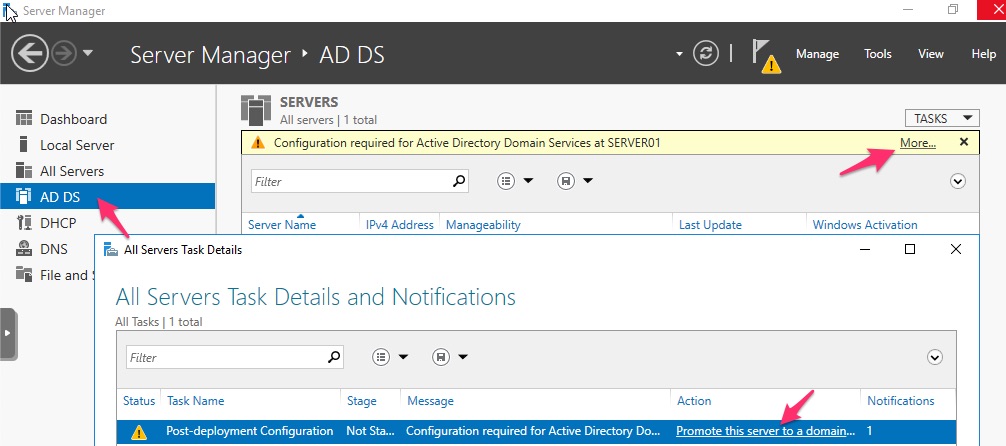
From within Server Manager go to AD DS in the left hand menu then click on More… in the top right corner followed by Promote this server to a domain controller.
Select the radio button for Add a new forest and then enter your new domain name in the ‘Root domain name’ field - we’ll call this domain testlab.local. Click on Next and after a few seconds you’ll be taken to the next screen.
Here is where you configure the DSRM password. Since we’re in a lab here we can just use the same password we used for admin. We’ll likely never need DSRM but it’s helpful to keep the password the same just in case.
Click Next, Next Next, Next, Next, Install. Ignore the warnings.
The installer will now carry out the process of creating our new domain and promoting the server to be a domain controller. Once this is complete a reboot will be required (this reboot will take some time). Once the reboot is complete you will notice that the login screen is slightly different, as this is now a domain joined computer.
DHCP Configuration
Since we’re running such a small network DHCP isn;t really necessary however as this is a pentest lab we might want it for tinkering with stuff.
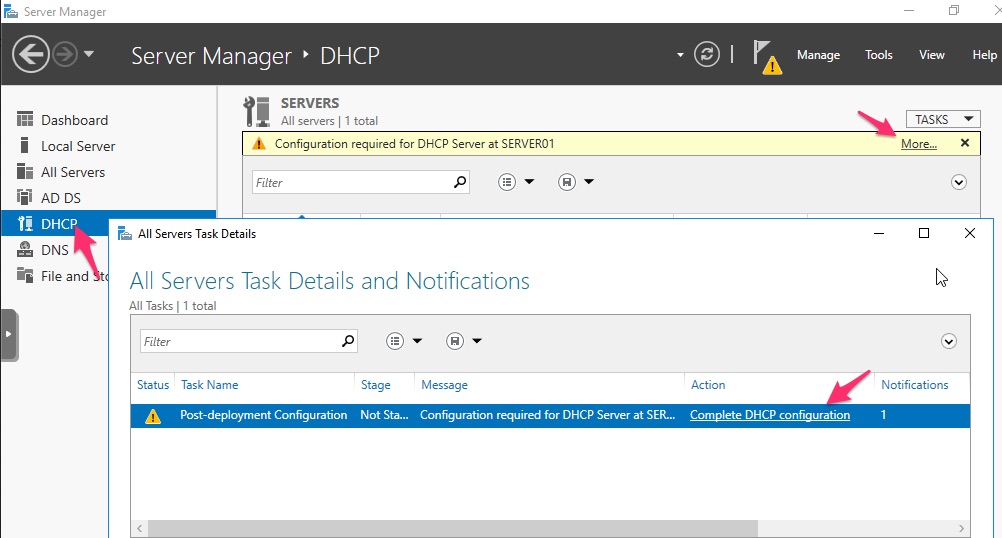
Within Server Manager choose DHCP from the left-hand menu and then click on More… and then Complete DHCP Configuration
Click Next and then Commit. The installer will configure all the internal bits that are required for DHCP within a Windows domain.
Now that DHCP is configured we need to add a scope. This is the bit that tells DHCP hosts on the network all the stuff they need to know and assigns IP addresses, etc.
From Server Manager choose DHCP from the Tools menu.
In the DHCP window expand your server and right click on IPv4. From the context menu choose New Scope…

Warning: If you find that New Scope is greyed out here, right-click on your server in the DNS window and go to All Tasks > Restart.
Click through the windows and assign sensible options. For the name you can put anything you want. It’s possible for DNS server to host multiple scopes for different networks when working with VLANs, etc. For now we are just going to have the one scope so the name isn’t important. I’m just going to use the network address 10.0.0.0 for mine.
For the DHCP range again do something simple. We’re not planning to have many hosts in this network so I will set the scope as 10.0.0.50 - 10.0.0.99
Set the Length to 24 which will automatically set the appropriate mask (255.255.255.0) and then click on Next.
We will no need any exclusions so click Next again.
Here we can now set the length of our DHCP reservations. The default of 8 days suits me for this lab. Click on Next, Next.
In the Router window set the address configured for the gateway in your virtual network, in my case that is 10.0.0.254, and then click on Next.
Click Next, Next, Next, Next, Finish.
You now have a completed DHCP scope set up.
User setup
Last of all we should set up a couple of users in our Active Directory so we can test things with them down the line.
From Server Manager select Active Directory Users and Computers from the Tools menu.
In the ADUC window expand your domain and select the Users OU. (Often companies will have much more structure here but this isn’t necessary for our lab)
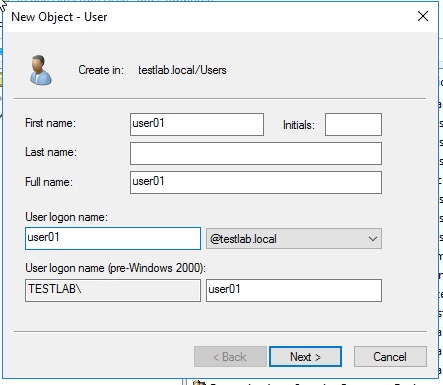
Then click on the new user icon at the top of the window:

Enter a name in the First name field and the User logon name field and then click Next:
Enter a password that suits Windows default complexity rules, untick User must change password at next logon and tick Password never expires. Then click Next and then Finish.
That’s it for user setup (Do this as many times as you want for multiple users.)
OK Done
So now we have completed our server setup. We have a Windows domain with a Domain Controller and a configured DNS and DHCP service. That was the long part!
In Part 2 we will look at setting up our desktop hosts.