Now that we have Proxmox installed on the Proxtop (that’s what i’m calling it now) it’s time to get an understanding of how things in Proxmox work and how we’re going to get our lab configured.
Let’s look around
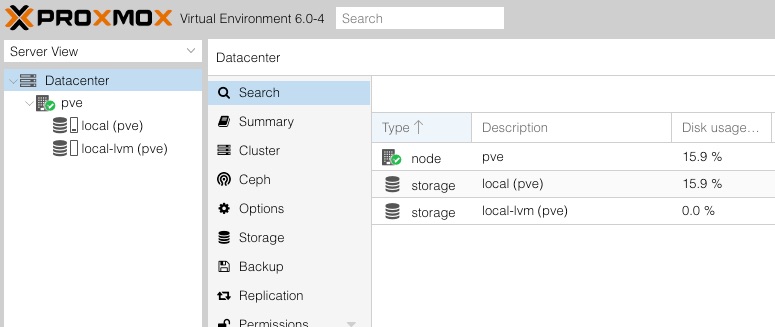
After initial installation of Proxmox using somewhat default settings you should have a configuration like this: (If you can’t see everything under Datacenter you might need to expand the tree):
You can change this to other views but for now we are going to stick with the default Server View
At the top of the tree is the Datacenter which for us is the highest level of the infrastructure. Coming in under this is pve which in hindsight I wish I’d called Proxtop but hey, maybe next time. pve is the ‘node’ or physical server within the Datacenter that can host virtual machines. If we were to add more laptops (or other Proxmox devices) to our cluster they would show at this level, all sharing the same Datacenter
When you select Datacenter you get additional options to the right which are all reasonably self explanatory. Since we’ll be working with a single node then most configuration steps we perform will be at the node level.
Under pve there are two storage devices - local (pve) and local-lvm (pve). When I deployed Proxmox to the 1TB drive within the laptop the installer automatically partitioned the drive in to basically a system and a data partition (also a swap partition but it doesn’t show that here). It gave the system partition approximately 100Gb and the data partition approximately 800GB. My impressive skills in mathematics allows me to identify 100GB missing somewhere, one day I’ll go hunting for it.
local (pve) is the system partition where the OS and Proxmox software is installed and running from. We can install upload our ISOs and other data files here. If we were add add additional nodes to our Datacenter they would all have an independent system drive like this.
local-lvm (pve) is the data partition. This is used for storage of VM’s and NOTHING ELSE!. If we had multiple nodes in our datacentre we could look to having these disks replicated which would enable server migration should we lose a node for any reason. We are going to stick to just one node for now so not something we need to consider.
Looking at the pve node we can see a lot of cool stuff to play with:
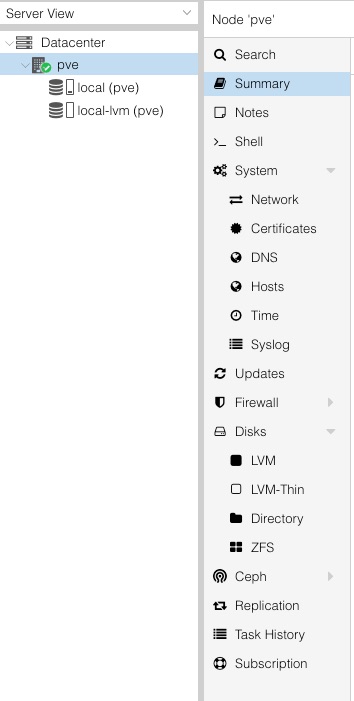
Summary give us a nice overview of the node and its resources.
Shell allows us to access the terminal for the node itself. I think this is pretty cool to have available as it allows easy access to the host for troubleshooting and tinkering.
System gives us an overview of the services running on our host. Within system we also have the expected bits and pieces such as Network, DNS, NTP, etc.
Network is obviously where we configure our network stuff. I’ll expand on that below.
Updates show’s the status of packages installed on the host and also gives the option to perform upgrades.
Firewall is as expected. We can add, edit and remove firewall rules as we see fit. Within this there are also additional Options and a Log view.
Disks gives us an overview of the physical disks attached to the system (in my case it shows my 250GB SSD that is currently not utilised for Proxmox, and my 100TB SSD that we have deployed to). Within Disks we also see information on the paritions configured by Proxmox.
Ceph is a storage system that needs more understanding before I tell you anything about it. I won’t be utilising it in this lab.
Replication is for replicating when there are multiple hosts within the datacentre
Task History shows us a history of the tasks performed on the host, the same as what is in the lower window.
Subscription shows details of the subscription status.
Proposed Infrastructure
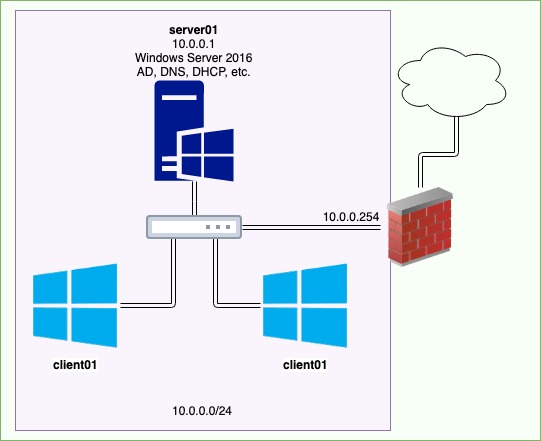
I’m planning to set up something quite simple to begin with. A Windows DC with all the basic services, and a couple of windows clients, all on the same subnet.
Sensibly, the first thing we should figure out here is the networking.
In a default Proxmox installation the host is configured with a virtual network bridge that is attached to the physical interface. Any VM’s that are created will by default attach to this bridge and in essence have direct access to your physical network, as if they were connected directly to it. It’s as if the laptops network interface is being utilised as a switch (which in essence it is).
Since we are wanting to create a pentesting lab it would be a good idea to separate our virtual network from our physical network. Proxmox give various options for network configuration but for this infrastructure i’m going to configure a NAT network (Proxmox refers to this as Masquerading). Basically it means that we have IP’s that are unique to our virtual infrastructure and any traffic that needs to traverse the bridge goes out using the Lpatops IP address. This will restrict our broadcasting to just our local virtual network.
For more details about the various network configurations available in Proxmox there is plenty of info on their wiki.
Networking configuration in Proxmox can be done within the GUI, or for more advanced config requires manually editing the file /etc/network/interfaces.
To edit the file first SSH on to the host. (Could possible do this via the GUI shell but my terminal is my friend)”
$ ssh root@192.168.0.220
Obviously your hosts IP address will likely be different to mine.
the Proxmox host comes with vi installed which will do just fine! OK so for me vi was acting weird in the shell so reverted to Nano like a pleb.
root@pve:~# vi /etc/network/interfaces
Once opened you’ll see the current configuration of the network interface:
auto lo
iface lo inet loopback

iface enp3s0f1 inet manual

auto vmbr0
iface vmbr0 inet static
        address 192.168.0.220
        netmask 255.255.255.0
        gateway 192.168.0.1
        bridge_ports enp3s0f1
        bridge_stp off
        bridge_fd 0
To set up Masquerading this needs to be updated as below. Ensure you update the address and gateway of iface en01 to match your own. Also updte the CIDR in the iptables commands to match yours if you have chosen something else.
auto lo
iface lo inet loopback

auto enp3s0f1
#real IP address
iface enp3s0f1 inet static
        address  192.168.0.220
        netmask  255.255.255.0
        gateway  192.168.0.1

auto vmbr0
#private sub network
iface vmbr0 inet static
        address  10.0.0.254
        netmask  255.255.255.0
        bridge_ports none
        bridge_stp off
        bridge_fd 0

        post-up echo 1 > /proc/sys/net/ipv4/ip_forward
        post-up   iptables -t nat -A POSTROUTING -s '10.0.0.0/24' -o enp3s0f1 -j MASQUERADE
        post-down iptables -t nat -D POSTROUTING -s '10.0.0.0/24' -o enp3s0f1 -j MASQUERADE
Once this has been updated save and exit vi. If you’re not pro level yet this can be achieved by pressing Esc and then entering the command wq! and pressing enter.
Once this is done a reboot is required. This can be achieved via the Reboot button in the GUI under the pve host.
Last bit
Now that the basic infrastructure is sorted it is necessary to add some ISOs to the host for installing or OS’s. This bit is realtively easy. Within the GUI browse to Datacenter > pve > local (pve) and select Content
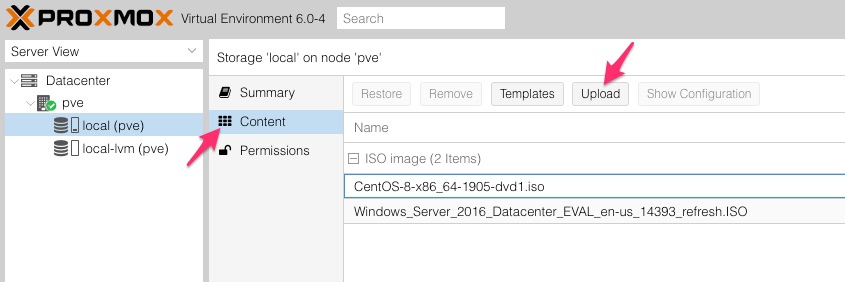
Here you will see any existing ISO files that you’ve uploaded. Assuming this is your first visit here then you should not see any. You can see two images in my screenshot as I made the sensible decision to test this before writing about it. To upload ISO file just click the Upload button at the top of the window and choose your ISO. This can take a while on some networks, i;m uplaoding over WiFi and it took an hour or two for each ISO.
That’s it for this section. Stay tunes for Part 1 where we crack on with the server install and configuration.