Warning:It’s always a good idea to understand what you’re doing before you try to do it. I just wrote two pages on a VM host setup and then found out I was making things way too difficult for myself. OK carry on.
Click here to skip past all my jabbering
INTRODUCTION
I wanted a wee lab setup so I could test bits and pieces. In the past i’ve tried this with AWS and with local virtualisation. AWS has it’s benefits but it doesn’t support client installations (i.e. Windows) and so you have to rely on mimicking clients with server installations. As well as this the cost creeps up over time. Local virtualisation is good and I still use it on a regular basis however once you get a few VM’s running everything really slows down. I wanted a small independent virtualisation setup that wouldn’t cost the earth, be too big, or too noisy.
I have an old server sitting at home that i’ve tried purposing for this in the past however it’s a bit over the top and due to it’s age it needs some upgrades to really be helpful. It’s also LOUD. I may roll it out again in the future byt for now I want something more dainty.
I started looking at Intel NUCs and am still thinking about heading down this route. On eBay you might be lucky to pick up an i7 NUC with a buttload of RAM and an SSD which is ideally what i’d want for something simple.
After browsing and contemplating for a while I realised that I was using a reasonably spec’d gaming laptop as a footrest. It’s an i7 with 16GB RAM and 2xSSDs. More RAM would be nice but I think this would be fine to begin with.
I initially atempted to put ESXi on to here for the simplicity of setup however I spent a day doing that and got as far as having ESXi installed but it couldn’t detect my hard drives. VMWare doesn’t really support this type of setup and after 5.1 they started pulilng all sorts of drivers out of their installation media which makes installin later version on unsupported hardware a tad tricky. It is still possible and I’ll get around to documenting my progress in another blog but until then let’s crack on with the juicy stuff.
So now what?
I initially went for ESXi because it is an all in one solution which is easier for me to get my head around, but now i’ve lost a day (I learnt a couple of things though so that’s OK). My next plan was to set up a CentOS host and install KVM/QEMU then administer this with Proxmox. I got as far as the Proxox bit and then found out the Proxmox VE is basically a full installation package, it includes the OS and everything and so essentially is a ‘baremetal’ hypervisor. Wish I’d realised this a couple of hours ago. Oh well, it’s all finger exercise.
KVM/QEMU, QEMU/KVM?, WTF?
Note:OK I wrote this bit when I thought I was having to set up these guys by myself but now I don’t. It is a good bit of info though so i’m going to leave it. You can skip it if you ust want to get on with the setup.
OK i’ve never really got my head around this but but also i’ve never really tried. I’ve just read a very simple explanation(What Is the Difference between QEMU and KVM?) and basically it’s like this; KVM is a type 1 hypervisor meaning it utilises processor virtualisation technology auch as Intel VT-x, QEMU is a type 2 hypervisor meaning it’s virtualisation is software based and slower than KVM, QEMU can utilise KVM as an accelerator to improve it’s performace. Not sure if this makes QEMU a type 1.5 hypervisor. Also not sure if KVM can be used on it’s own or not, i’ll figure that out another day.
So basically after we get our OS in place we will get KVM sorted and then QEMU. It will then be QEMU that we interact with. Got it.
Proxmox VE Installation
Right so basically everything above is pointless. This is where the actual installation process starts.
Creating installation media
We begin with sourcing the install media from Proxmox. We want the ISO installare from the ISO Images Files page. There is a direct download and a bittorrent link. At time of writing the latest version was 6.0-1 and the bittorrent ISO download was a little under 750MB.
To get the ISO on to a USB we could use an app like unetbootin, or we could use the terminal. We’re advanced technical users right? ..Right? Let’s use the terminal.
First we need to establish the location of your USB device. We can do this using diskutil
11:28 ➜  / % diskutil list
/dev/disk0 (internal):
   #:                       TYPE NAME                    SIZE       IDENTIFIER
   0:      GUID_partition_scheme                         500.3 GB   disk0
   1:                        EFI EFI                     314.6 MB   disk0s1
   2:                 Apple_APFS Container disk1         500.0 GB   disk0s2

/dev/disk1 (synthesized):
   #:                       TYPE NAME                    SIZE       IDENTIFIER
   0:      APFS Container Scheme -                      +500.0 GB   disk1
                                 Physical Store disk0s2
   1:                APFS Volume Untitled                426.3 GB   disk1s1
   2:                APFS Volume Preboot                 70.5 MB    disk1s2
   3:                APFS Volume Recovery                1.0 GB     disk1s3
   4:                APFS Volume VM                      12.8 GB    disk1s4

/dev/disk2 (external, physical):
   #:                       TYPE NAME                    SIZE       IDENTIFIER
   0:      GUID_partition_scheme                        *4.0 GB     disk2
   1:                        EFI EFI                     209.7 MB   disk2s1
   2:                  Apple_HFS temp                    3.7 GB     disk2s2
OK we can see above that my USB stick is /dev/disk2. If you had many disks and weren’t sure you can always run diskutil list with the device removed and compare the two outputs.
In this output it is evident that the USB key is partitioned using an Apple format. We want to go old school and have it FAT32 formatted with an MBR partition. To achieve that we can issue the following:
diskutil partitionDisk /dev/disk2 MBR FAT32 PROXMOX 0b
We’ll quickly break this down:
paritionDisk is used to partition or re-partition a disk. It will destroy the existing partition table so make sure there is nothing important on there.
/dev/disk2 is the location of the USB stick
MBR is the partition table format for Master Boot Record
FAT32 is the format for the partition itself. Very stable, much love
PROXMOX is just the name that we are assigning to the partition. It is important that this is all UPPERCASE or it will throw an unhelpful error about an invalid name
0b is the size of the partition. You can issue any size here and specify units (b)ytes (m)egabytes (g)igagbytes. Using 0b as above tells it to ust use all available space
After running the above command we’d expect an output similar to:
Started partitioning on disk2
Unmounting disk
Creating the partition map
Waiting for partitions to activate
Formatting disk2s1 as MS-DOS (FAT32) with name PROXMOX
512 bytes per physical sector
/dev/rdisk2s1: 7822384 sectors in 977798 FAT32 clusters (4096 bytes/cluster)
bps=512 spc=8 res=32 nft=2 mid=0xf8 spt=32 hds=255 hid=2048 drv=0x80 bsec=7837696 bspf=7640 rdcl=2 infs=1 bkbs=6
Mounting disk
Finished partitioning on disk2
/dev/disk2 (external, physical):
   #:                       TYPE NAME                    SIZE       IDENTIFIER
   0:     FDisk_partition_scheme                        *4.0 GB     disk2
   1:                 DOS_FAT_32 PROXMOX                 4.0 GB     disk2s1
Next step is to write the ISO to USB. First unmount the USB device:
sudo diskutil unmountdisk /dev/disk2
Folowed by using dd to copy the data from the ISO to the USB:
sudo dd if=/Path/to/downloads/proxmox-ve_6.0-1.iso of=/dev/disk2
dd doesn’t give much info while it’s progressing. Hopefully your USB device has a status light to show that something is happening. There are some ways to get status from dd but we’re not going in to that here. Joojle it.
Installing Proxmox to hardware
Hopefully the previous steps went well and you now have a Proxmox install USB in your clammy hand. Install this in your destination host and get it booting from USB. This might need another trip to the BIOS to go in to legacy mode and make sure you can set USB as your first boot device, or enabe boot device selection.
Once this is done you will start through the Proxmox installation process. This is all quite striaght forward and shouldn;t require much handholding. It’s a matter of choosing destination disk, setting up passwords, etc.
Tehre will be a network config screen at one point. It will pull network details from DHCP but make sure to change the acquired IP address to one outside your DHCP range.
After this the file transfer and installation will begin and after a few minutes you will be requested to reboot. Reboot and remove your installation media. If you have installed to a device other than the primary boot deice remember to change boot device order, or enter the boot selection screen.
Once Proxmox boots up you will be faced with a simple screen telling you to browse to the IP address of the host to access the GUI:
------------------------------------------------------------------------------
Welcome to the Proxmox Virtual Environment. Please use your web browser to
configure this server - connect to:

    https://192.168.0.220:8006/

------------------------------------------------------------------------------
Obviously your IP address will most likely be different to the above.
On browsing to the address you will be greeted with the Proxmox login window. Login with root and your previously set password to log in. You will at first be faced with this message:

Oh wow what? Ok don’t fret. This is just saying we don;t have a paid subscription, we can still use Proxmox but will not get paid support (this is my understanding anyway, correct me if i’m wrong.)
A quick Google will take us to John’s blog and a brief guide on how to remove this message.
OK the message and go to Datacenter > pve > Shell
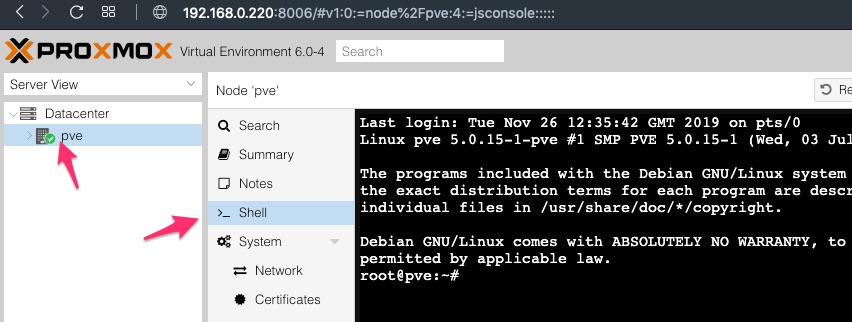
And enter this in the terminal:
sed -i.bak "s/data.status !== 'Active'/false/g" /usr/share/javascript/proxmox-widget-toolkit/proxmoxlib.js && systemctl restart pveproxy.se
This doesn’t give much feedback, and in my case I got a Connection Closed pop up over the terminal. However after logging out and re-starting the browser the warning no longer appears. For more info on what the command is doing check out John’s guide above.
So at this stage we now have the basics of a Proxmox hypervisor ready to go. My plan for this is to set up a small Windows domain, so a server and a couple of clients. We’ll get on to that in the next post.